This post will help you quickly master what GODIAG GT100 can do and how to use it.
What can GODIAG GT100 do?
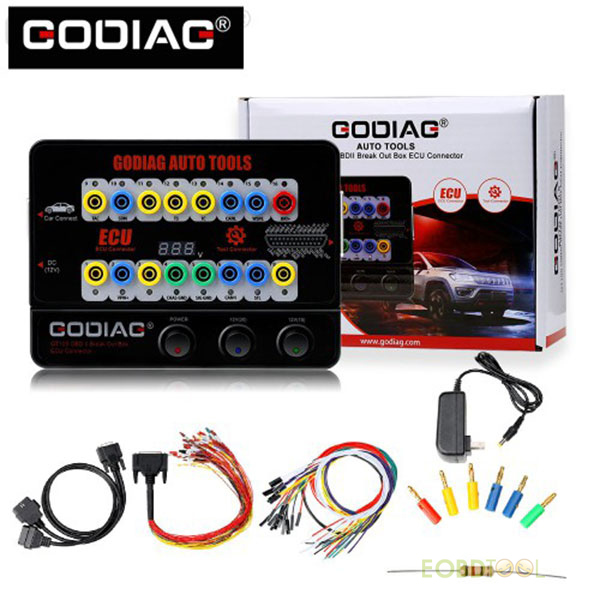
GODIAG GT100 Auto Tools OBDII Break Out Box ECU Connector is the latest testing platform for OBDII protocol communication detection and ECU maintenance/diagnosis/programming/coding.
-It can convert the vehicle OBD2 port into 16 pins for signal detection and electrical level conversion.
-It is able to connect single modules or multiple vehicle modules.
-It can work with any diagnostic tool to determine whether the car is communicating properly.
-It also can supply power to vehicle when changing the battery to prevent data loss of the vehicle control module, automatic lock, remote control of the key failure, failure lights on.
What is the meaning of the GODIAG GT100 indicator?
There are 16 indicators on the GODIAG GT100 ECU Connector. By connecting the vehicle and diagnostic tool via OBDII, Godiag GT100's LED will indicate whether the OBDII diagnostic interface has good communication with the car.
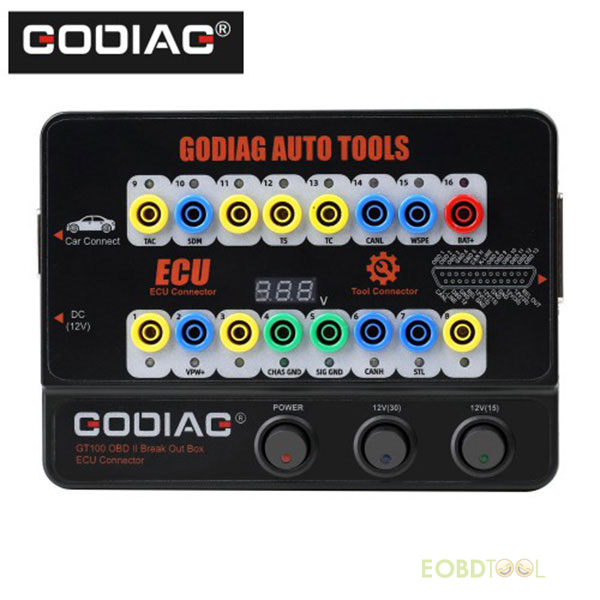
GODIAG GT100 indicators meaning:
1.Manufacturer custom
2.SJE1850 wire
3.Manufacturer custom
4.Power grounding
5.Signal grounding
6.SAEJ2284 <CAN> high
7.ISO9141-2&iso, DIS4230-4 K wire
8.Manufacturer custom
9.Manufacturer custom
10.SJE1850 wire <bus->
11.Manufacturer custom
12.Manufacturer custom
13.Manufacturer custom
14.SAEJ2284 <CAN> low
15.ISO9141-2 & ISO/DIS 4230-4L wire
16.Car battery positive
Please kindly notice:
To avoid personal injury and vehicle/equipment damage, please read this manual first.
Here are some safety precautions that should be followed when working on the vehicle:
1).Always work in a safe environment.
2).Wear the goggles that comply with ANSI standards.
3).Ensure that clothes, hairs, hands, tools and equipment are kept away from the running engine parts or the hot engine parts.
4).Ensure that the working area is well-ventilated because the vehicle exhaust is toxic.
5).Place bricks in front of all wheels to prevent accidental movement of the vehicle.
6).During testing and working, someone must supervise the vehicle.
7).Be extremely careful when working near the ignition coil, distributor cap, ignition wire, spark plug, these components will generate dangerous voltage.
8).Shift to P gear (for an automatic transmission car) or N gear (for a manual transmission car), and ensure that the parking brake is in the active state (pull up the handbrake).
9).Make sure there is a fire extinguisher suitable for gasoline/chemical/electrical nearby.
10).Do not plug or unplug the device when the ignition is turned on or the engine is working.
11).Keep the equipment dry and clean, and avoid contact with oil, water or grease. Please clean the equipment with a clean cloth and gentle detergent.
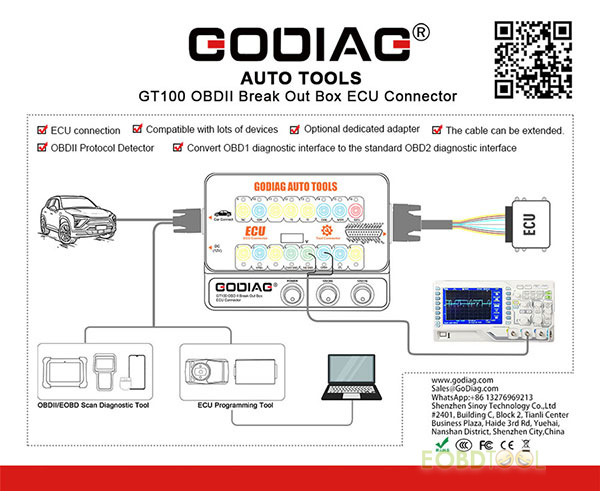
How to use the following functions of GODIAG GT100?
–OBDII Protocol Detector
–ECU connection
–Compatible with lots of devices
–Convert OBD1 diagnostic interface to the standard OBD2 diagnostic
–Multi-ECU connection mode
–The cable can be extended
– Power the car when changing the battery
–Optional dedicated adapter
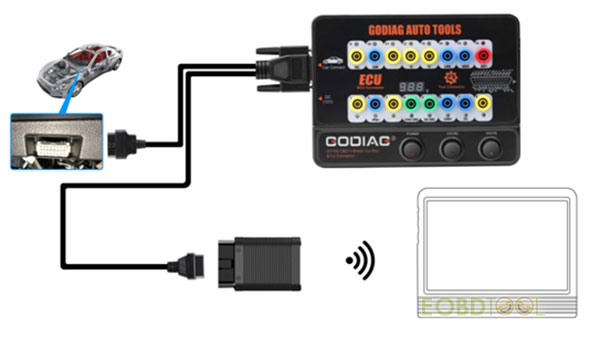
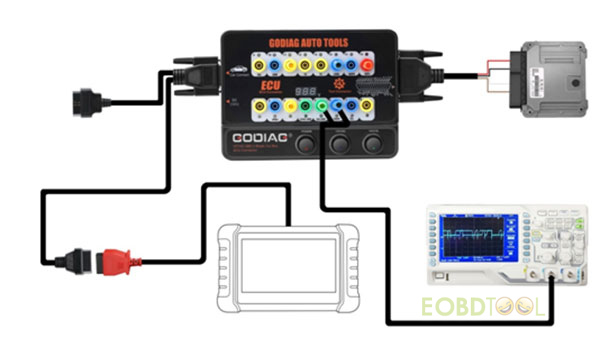
1.OBDII Protocol Detector & communication detection:
Step 1: Connect GODIAG GT100 OBD2 Breakout Box to the OBDII port of the vehicle via the OBD 2-in-1 extension cable
Step 2: When the device displays the voltage, turn on the power switch of GODIAG GT100.
Step 3: Then connect to the diagnostic tool, when the tool is communicating with the car, the LED indicator of corresponding protocol will light up or flash.
Note: If the CAN protocol is detected, it will have the maximum brightness.
When the communication is successful, the corresponding CAN-H and CAN-L will dim or twinkling weakly.
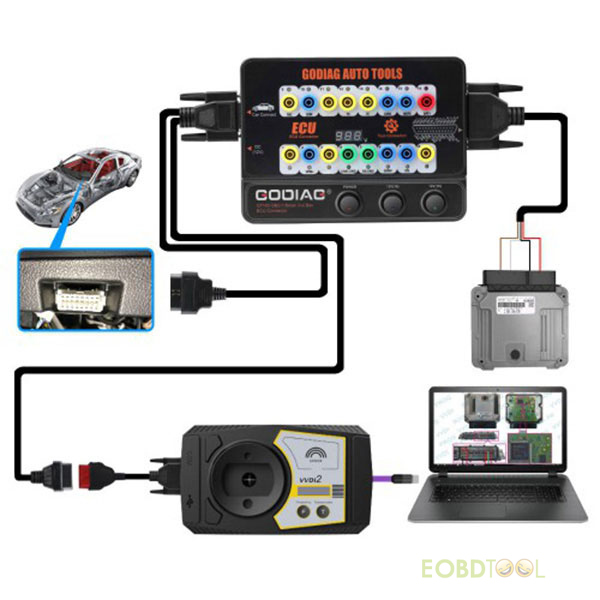
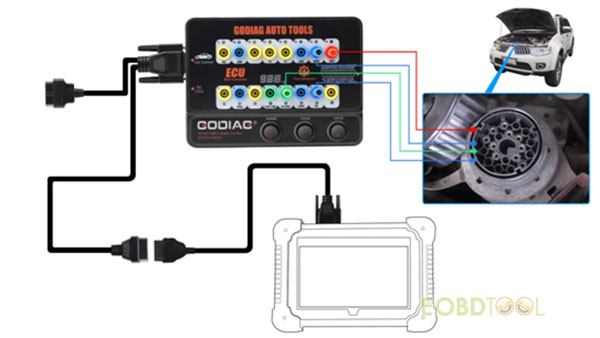
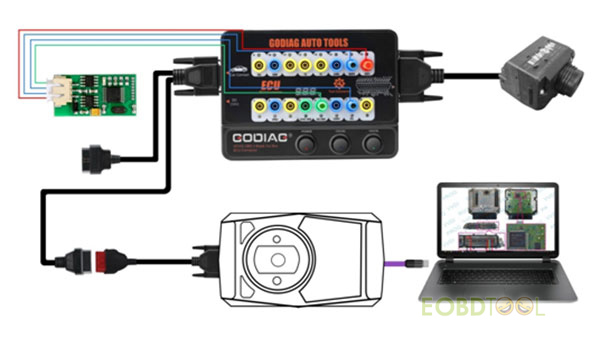
2.ECU connection: single module connection
Use GODIAG GT100 to work with a single ECU module can make user more convenient to diagnose or program single module.
Step 1: Connect the ECU with the color jumpers.
Note: If the ECU is CAN protocol, please check whether you will need to connect a 120 ohm resistor.
Step 2: Supply power to GT100 by connecting to the OBDII port of car or by an AC power adapter.
Step 3: Connect one diagnostic tool or ECU programmer to diagnose or program a single ECU module
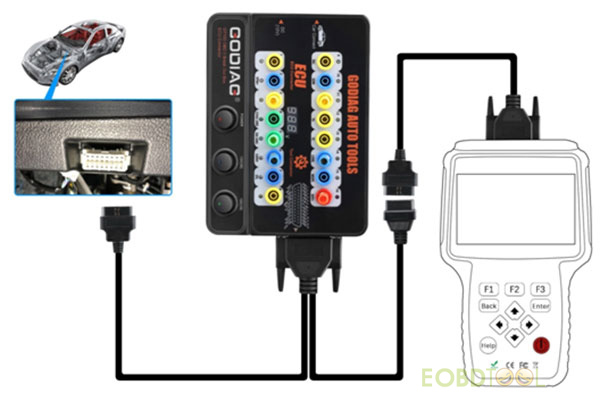
3.Banana plug extension connection:
Extend the car's OBDII 16pin interface to tell you whether the OBDII interface connection is good or not, which is convenient for the test of OBDII interface voltage waveform.
4.Convert OBD1 diagnostic interface to the standard OBD2
According to the diagnostic interface communication protocol and use the corresponding connector to convert the OBD1 interface into OBD2 interface.
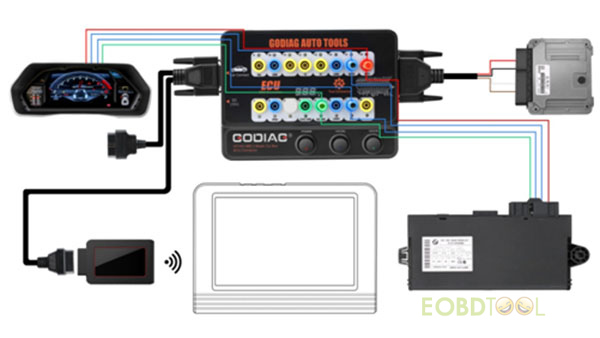
5.Connect multiple ECU control modules:
Connect multiple ECU control modules at the same time can make the professional engineers more convenient to detect and maintain.
6.When using the extension cables?
-The space of the diagnostic interface location is too narrow to connect to the diagnostic tool;
-The user finds that the diagnostic cable is not long enough during maintenance.
If you have any problem above, you can extend the cable by 1.2 meters.
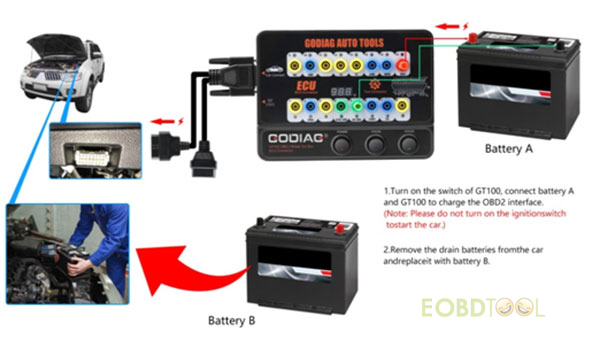
7.Supply power to the car when replacing the used battery:
Step 1: Prepare battery A to supply 12 V power by connecting to No. 16 / 4 / 5 holes of Godiag GT100 & to the OBD2 port of the car.
Note: 1.Turn on the power switch of Godiag GT100.
2.Don't turn on the ignition switch! Don't start the car!
Step 2: Replace the brand-new battery B with the used battery in the car, which will ensure that the car has full power to prevent data loss and audio lock-up or the malfunction due to lack of power to the ECU control module.
8.Optional dedicated adapter:
The dedicated adapter will be released to help GT100 connect to the special ECU module.
The common GODIAG GT100 connection diagram:
GODIAG GT100 OBD2 ECU Connector Unboxing video:
GODIAG GT100 Auto Tools OBD II Break Out Box ECU Connector:
https://www.eobdtool.co.uk/wholesale/godiag-gt100-auto-tools-ecu-connector.html