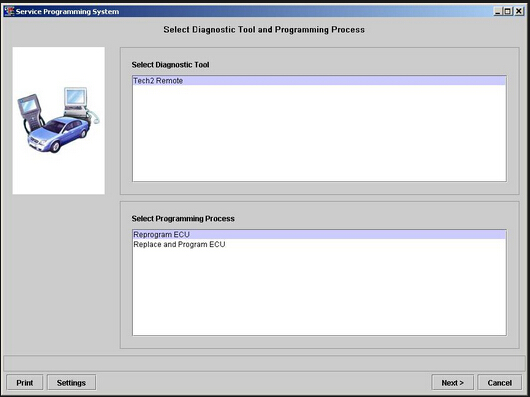
What’s SPS?
The GM Service Programming System (SPS) is a personal computer (PC) application used to reprogram vehicle electronic control modules (ECMs). The SPS application programs General Motors programmable control modules by using the Tech 2 Flash scan tool or the Next Generation scan tool as a “pass-thru” device to communicate program data to the vehicle control module. All programming steps are activated and finalized through the PC
But will China clone GM Tech2 scanner support SPS?
Yes, it does. But you need to focus on these points:
1) TIS2000 does not support 2007+ models. So SPS will not able to program ECU for GM 2007 up.
2) SPS must work with TIS2000 with USB key. If you get the free TIS2000 software without USB dongle, sorry, it will not work.
3) If you need to program Saab ECU, you need specialized Saab TIS2000 CD and USB key.
4) For SPS CD software, you need a subscription on official website: http://genisysotc.com/
The GM Service Programming System (SPS) kit contains two compact discs (CD):
- An Application CD which loads the SPS application
- A Data CD which loads SPS data
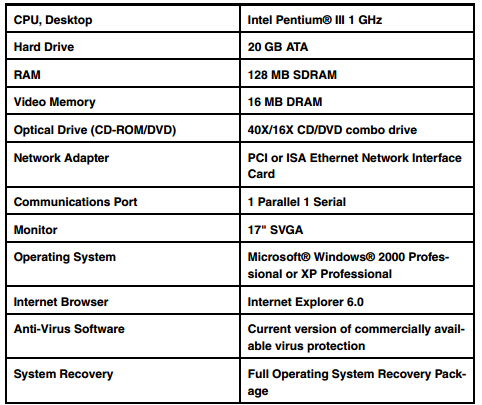
Computer & O/S requirement:
How to install Service Programming System (SPS) for Tech II?
Before you install the SPS application, answer the following question to determine if the SPS application is already installed on the PC: “Is there a TIS 2000 icon on the Window’s desktop?”
- If YES, go to step 3: “Update the SPS Data”
- If NO, proceed with the steps below
Step 1: Check and/or Install TCP/IP Protocol
Determine if TCP/IP protocol is installed on the PC and install if necessary.
These installation steps are for setting up the TCP/IP protocol for first-time, stand-alone users. Be aware of the following:
- If you have a network card installed then you only need to verify that TCP/IP protocol has been configured.
- If your PC is already set up with TCP/IP protocol, go to step 2: “Install the SPS Software”.
To install the TCP/IP protocol, follow these steps:
1 Do one of the following:
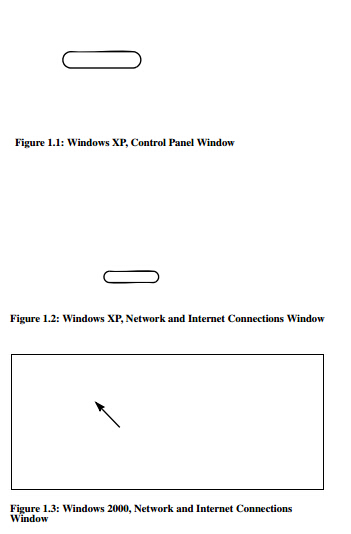
- For Windows XP, click the Window’s Start button, and then select Control Panel. With the Control Panel window displayed, select Network and Internet Connections (see Figure 1.1 and Figure 1.2). This displays the Connection Properties dialog box (see Figure 1.4 on page 3).
- For Windows 2000, right click the My Network Places icon on the Windows desktop. With the Internet Connections window displayed, right click Local Area Connection and then select Properties (see Figure 1.3). This displays the Connection Properties dialog box (see Figure 1.4 on page 3).
2 In the Connection Properties dialog box, see if TCP/IP is already listed under “This connection uses the following items.” If not, click the Install button to display the Select Network Component Type dialog box.
3 Click Protocol and then click the Add button to display the Select Network Protocol dialog box
4 Under Manufacturer, select Microsoft and under Network Protocol, select Internet Protocol (TCP/IP). Then click the OK button. Windows then installs the protocol automatically. 5 Continue with the steps in the next section, “Install the SPS Software”
Step 2: Install SPS CD software
Install the SPS Application CD software, which includes installing the USB security key (security device).
To install the SPS software, follow these steps:
1 Insert the Application CD into the PC’s CD drive. The TIS 2000 Installation Welcome window appears automatically.
Note: If the TIS2000 software was previously installed and removed from the PC, a message may appear asking to reuse old settings. If so, click the NO button to NOT reuse old settings.
2 Click the Next button to continue. This displays the Language Selection window.
3 Select a language for the application and then click the Next button. This displays the Choose Destination Location window
4 Click the Next button. This displays the Choose Serial Port window.
Note: Clicking the Next button on the Destination Location window places the SPS application in the destination directory C:\Program Files\cosids. You can optionally click the Browse button to select a different destination directory for the file
5 Select the serial port to use for the scan tool connection. This must be an open COM port where no external devices are connected. Then click the Next button. This displays the TIS2000 Installation Mode window.
6 Select Standalone and then click the Next button. This displays the Set DEALERSHIP window.
7 Select NAO (North American Operations) and then click the Next button. This configures settings, starts the Decurity Device Installation module, and displays the TIS2000 Security Device Add / Remove window. Note: This installation of TIS2000 supports reflash of Saturn vehicles. Other dealership installations are not supported.
Note: The Security Device Installation module configures the USB security key, which is a component of the SPS Kit. The installation of the USB security key requires strict attention or TIS2000 will not perform as expected.
8 Click the checkbox above USB Security Key to place a checkmark in the box. Then click the Continue button. This displays an Information window
9 Follow the instructions on the Information window and then click the OK button. This displays a Hardware Installation message box.
10 Click the Continue Anyway button. This displays the Program Completed window.
11 Install the purple USB security key as instructed on the window and then click the OK button. Note: Make sure the security key installs securely into the PC’s USB port. After installing the software, do not remove the security key from the USB port; it must remain in the port for the TIS2000 SPS application to work.
12 This begins the TIS2000 software installation and displays a progress indicator message. Wait for the installation to complete and for the completion message to appear.
TIS2000 installation video guide:
13 Click the OK button.
14 Remove the Application CD from the PC’s CD drive. 15 Continue with the steps in the next section, “Update the SPS Data”
Step 3: Update the SPS Data
Update the data with the SPS Data CD.
Important: • If updating both the Application CD and the Data CD, ALWAYS install Application CD first!
Use the following steps to update the SPS data at initial software installation and whenever you have a data update.
Note: During the update, the TIS2000 software skips the initial language, dealership, etc. steps and uses current TIS2000 settings. TIS2000 also skips over SecDevIns (Security Device Installer) and uses the current TIS2000 settings. If installing a new or different security key, see details pertaining to security key issues in “Troubleshooting”.
To update the SPS data, follow these steps:
1 Insert the Data CD into the PC’s CD drive and wait approximately 20 seconds for the TIS2000 Update message to appear.
Note: On Windows XP systems, a browser window may open displaying the contents of the CD. If so, close the window and double-click the TIS2000 icon on the Windows desktop. Because TIS2000 looks for new updates each time you start the application, the Update message appears.
2 Click the OK button to continue. This begins the update and displays a progress indicator message (Figure 1.21). When the update completes, a completion message appears.
3 Click the OK button. The application is ready to use.
4 Begin using the SPS application by double-clicking the TIS 2000 icon located on the Window’s desktop. Refer to “How to Navigate the SPS Application” to learn the basics of using the application.
Software Removal (Uninstall)
To uninstall the SPS application, click the Windows Start button and then select Programs, TIS 2000, TIS 2000 Uninstall.
For more SPS information, please check the SPS user manual here:
http://genisysotc.com/pdfs/526933GMSPSManual.pdf