The new Ford VCMII V97 will be released soon. Here is the Ford VCMII V97.01 installation instruction.
Compatible device:
Steps:
- Install VMware Workstation
- Establish a new Virtual Machine:Ford IDS
- Install IDS V81
- Install ids-91.01-full
- Install Ford-IDS-96.01-Full
- Install IDS-V97.01_Full
- Install VMware Workstation
Open My Computer>>Ford IDS (E:), to copy “en_windows_xp.iso” to Local Disk (D:).
Open “VMware-workstation-full-10.0.3-1895310” in Ford IDS (E:).
Click Next to continue.
Click Next, with the selection of “I accept… agreement”.
Select “Typical”.
Click Next to install to this folder or click Change to install to a different folder.
Click Next, with the selection of “Check for product updates on startup”.
Click Next.
Click Next, for shortcuts selection.
Click Continue to begin the process.
Performing the requested operations…
Enter license key:
go to E:\ to open “VMware-workstation-KEY” and copy the first key as “License key”.
Click Finish.
- Establish a new Virtual Machine:Ford IDS
Go to My Computer>>Local Disk (D:), to establish a new folder named “Ford VCM II”.
Open VMware Workstation on Desktop.
Select Files>>New Virtual Machine…
Click Next, with “Typical”.
Select Install dics image file (iso), click Browse… Desktop>>My Computer>>Local Disk (D:)>>en_windows_xp.iso
Click Next.
Go to E:\ to open “VMware-workstation-KEY” and copy the second key as “Windows product key”.
Click Next.
Name the Virtual Machine: Ford IDS, and Browse Desktop>>My Computer>>Local Disk (D:)>>Ford VCM.
Click Next.
Maximum disk size (GB): 120.0, click Next.
Click Customer Hardware… Memory>>Memory for this virtual machine: 1024MB. (it should be less than RAM) Click Close.
Click Finish.
Click Open a Virtual Machine.
Click OK.
Click OK.
Windows XP Professional setup…
Error: click OK.
Type your name and click Next.
Continue Windows XP Professional setup…
Installing VMware Tools…
…
Open the Date and Time Properties in VMware and the real computer.
The date and time in VMware should be the same as those in the the real computer.
Turn off the computer in VMware Player.
Click OK.
Close Ford IDS virtual machine.
And remove “Ford IDS” from the library.
Close VMware workstation.
- Install IDS V81
Open My Computer>>Ford IDS (E:), to open “VMware-workstation-KEY”.
Copy all lines with “time.synchronize…”.
Open My Computer>>Local Disk (D:)>>Ford VCMII.
Select Tools>>Folder Options.
Select View, to cancel the selection of “Hide extensions for known file types”, click OK.
Right click “Ford IDS.vmx”, select Open with>> Choose Program…>>Notepad. Click OK.
Paste at the last of the notepad, and save the change.
Open VMware workstation.
Select File>>Open…>>My Computer\Local Disk (D:)\Ford VCM II>>Ford IDS.vmx.
Click Create a new virtual machine.
Click Power on this virtual machine.
Click OK.
Click OK.
Open the Date and Time Properties in VMware and the real computer.
The date and time in VMware and those in the the real computer are different.
(Maximize the VMware interface.)
Select Start menu>>My Computer, show on Desktop.
Insert V81 DVD.
Open Computer>>DVD RW Drive (E:)>>VCMDVD.
Select “Calibrations”.
Click “Next”.
Click “Next”.
Click “Install”to begin the installation.
Installing…. (please wait until the software complete installation. Usually it will take about 30min-2h)
Calibration installation success.
Click “Finish” to exit the Wizard.
Click the exit button at the left bottom in VCM DVD interface.
- Install ids-91.01-full
Insert V96 DVD.
Open “Computer->DVD RW Drive (E:) Ford IDS”.
Close the “AutoPlay” interface.
Open “ids-91.01-full”
Choose setup language. And click “Next”.
Preparing setup…
Click “Yes” to proceed.
Click “Next”.
Click “Next” with the selection of “I accept the terms of the license agreement”.
Destination: click “Next”.
Click “Install”to begin the installation.
Installing…. (please wait until the software complete installation. Usually it will take about 30min-2h)
IDS icon on Desktop.
Configuring…
Adobe SVG Viewer 3.0 Setup…
Configuring…
Updating the database….
Configuring…
Successfully installed IDS.
Click “Reboot” to restart your computer.
Open “IDS” on Desktop.
Open it and you will get message.

(Note:
If you get this message, wait for several minutes, then IDS will start;
if you wait for more than 20 minutes and IDS cannot start, you have to uninstall IDS and re-install;
if you do not get this message and you can access to IDS, that okay.)
Click Abort IDS Start-Up.
Fill in the dealer type, country, and then click the tick button to continue.
IDS Software – Computer Date Synchronization, click “Continue”.
Open it and you will get message reading a non-renewable Evaluation License…. expire in 3 days.
(Note: If you do not get the message below it means the installation fails, then do not continue to operate.)
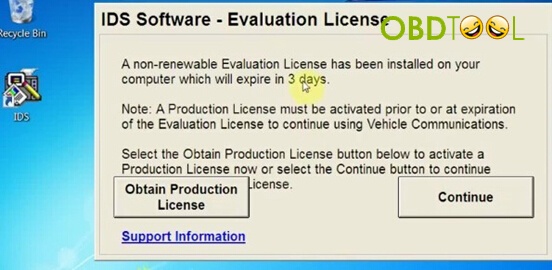
Click Continue.
Close IDS-91.1 interface. Click the tick button.
- Install Ford-IDS-96.01-Full
Open Computer>>Ford IDS (D:) >>Ford-IDS-96.01-Full.
Preparing setup…
Click “Yes” to proceed.
Click “Next”to update the installed IDS V91.01 to V96.01.
Installing…. (please wait until the software complete installation. Usually it will take about 30min-2h)
Configuring…
Adobe SVG Viewer 3.0 Setup…
Configuring…
Updating the database….
Configuring…
Successfully updated IDS to version 96.01.
Click “Reboot” to restart your computer.
Close Windows Security Center.
Open “IDS” on Desktop.
Click OK.
Minimize IDS-96.01 interface.
Open “Start” menu on Desktop. Start menu>>software updates>>control panel.
Network and Internet Connections>>Network Connections
Connect the vehicle and device Ford VCMII, you will see “Found New Hardware” prompt.
Wait the communication complete.
You will see “Local Area Connection” *ETAS VCI USB*, and close the interface.
Back to IDS-96.01 interface.
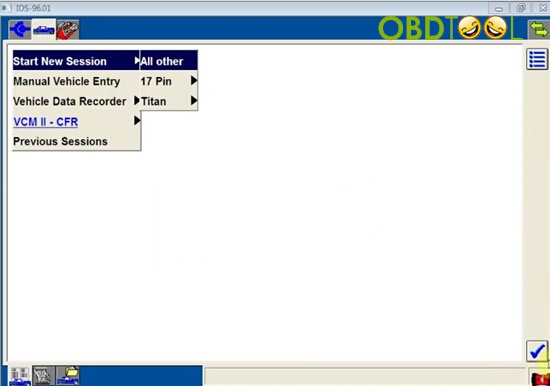
Start New Session->All other. Click the tick button.
Establishing communication to PCM…
Select vehicle specification, and click the tick button. E.g. The case here, select “2011 MY”.
Vehicle specification: click “YES” to go on.
Click the tick button.
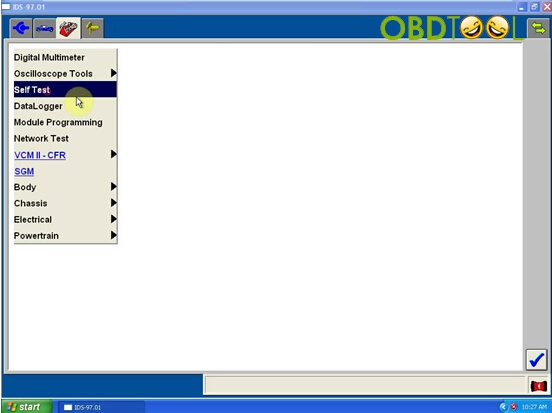
Select Self Test.
Click the tick button.
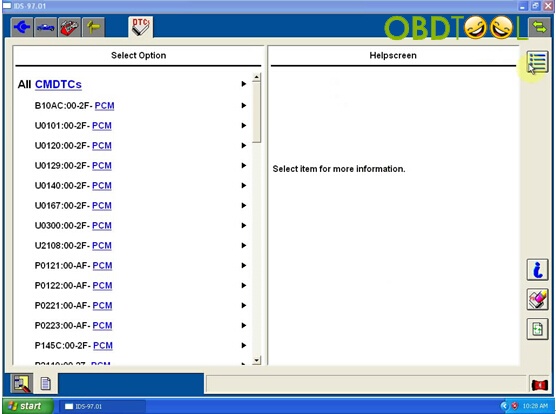
Select “All CMDTCs” and click the tick button.
Read and exit.
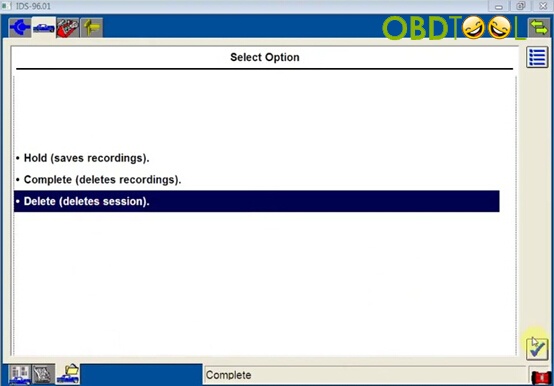
Delete (deletes session), then to go on.

Close the interface to exit IDS-96.01.
- Install IDS-V97.01_Full
Open Computer>>Ford IDS (D:) >>Ford-IDS-96.01-Full.
Preparing setup…
Click “Yes” to proceed.
Click “Next”to update the installed IDS V96.01 to V97.01.
Installing….
Configuring…
Adobe SVG Viewer 3.0 Setup…
Configuring…
Updating the database….
Configuring…
Successfully updated IDS to version 96.01.
Click “Reboot” to restart your computer.
Open “IDS” on Desktop.
Click the tick button to update VCMII software.
Installing Software Update on VCM II…(about 1 hour)
Click the tick button to continue.
Select Start New Session->All other. Click the tick button.
Establishing communication to PCM…
Select vehicle specification, and click the tick button. E.g. The case here, select “2011 MY”.
Vehicle specification: click “YES” to go on.
Select Self Test.
Click the tick button.
Select “All CMDTCs” and click the tick button.
Read and exit.
Done.
Ps. Read more about Ford VCM2 V97.01:
http://www.eobdtool.co.uk/wholesale/ford-vcm-ii-diagnostic-tool-with-wifi-card.html
This is from obd tool website technical support: How to install Ford VCMII V97.01 in VMware Player